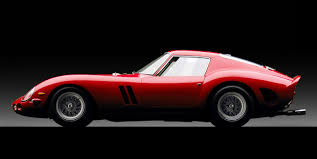
Assessment 2 : The Ferrari 250 GTO
| L |
| T |
| T |
| S |
As we were only a group of four it was expressed that the entirety of the Ferrari was not needed to be completed as the marking was based on the portion that you were responsible for, however it was still a desire of our group to attempt to finish the Ferrari in its entirety.
1.
The
first step was to create the template of the Ferrari. The initial program 123D Make was no longer available
however it was readily suggested that another program Slicer for Fusion 360 was suitable and we were able to get started
quickly in class. We downloaded the model, imported it into the program and
began exploring the realms of Digital
Making.
 |
| Model in Slicer |
2.
It
came to our attention that the Ferrari must be a particular size/scale as it
had to fit inside the BERG (Built Environment Roving Gallery), so we measured this
box and ensured our Ferrari would fit. As part of creating the template we also
had the option of what thickness of material to use as well as how many waffles we wanted running horizontally
and vertically. We decided on 18x22
waffles in 3mm MDF with a 3.1mm gap to allow the pieces to fit
tightly. After exporting the model, we had a to clean up the line work on adobe
illustrator in order for the Ferrari to print correctly. This was tedious as
there was a lot of line work however ensured a precise model with no weak
appendages.
 |
Cleaned up pieces to be exported and laser cut |
3.
Next
step involved printing the model.
This was a new experience as we were using the laser cutters, which I had never personally used before. It was
easier than expected and our pieces came out nicely. Assembling the pieces proved
much more difficult. The amount of waffles we had was overwhelming and although
it made for an extremely precise model, it took a long time to assemble. This
was not helped through the tight fit that we also wanted by only allowing for
1mm of wiggle. The template required a lot of force to slot the pieces together.
But once assembled it did not disappoint.


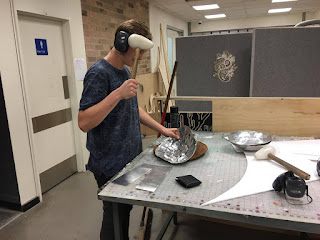
6.
It
was suggested to use trace paper to
fold over the template in order to guide where the skin would need to be
shrunk, curved etc. This was very helpful as it allowed me to understand where
to hammer the piece rather than just use my eye. So I began hammering.


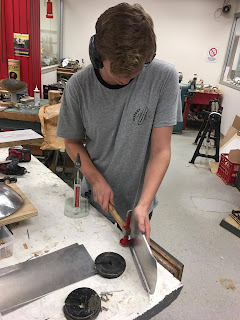
7.
This
was the finished product. My aluminum became very thin and difficult to mold; I
would have liked to make it a tight fit as in allow it to sit on the template.
This could have been done by incorporating parts of the hood into the piece etc.
But overall it sits quite nicely in comparison to the original Ferrari.


This comment has been removed by the author.
ReplyDeleteGreat work Henry. Nice story from start to finish. I would like to drive in that Ferrari LOL.
ReplyDeleteFinal grade = 82 Distinction
Total grade = 45 FAIL
Well done, time for a well earned rest.