Assessment 3 - Original Tutorials and Disciplinary Reflection
Aim
- To
create a torus (reverse curve).


Step 1 - Gather your metal and mark out the size at which you
want to cut the torus. If the intention is to
replicate the reverse curve that I created, then use a 200mm x 600 mm piece. Use
a Guillotine to cut your metal precisely.
Step
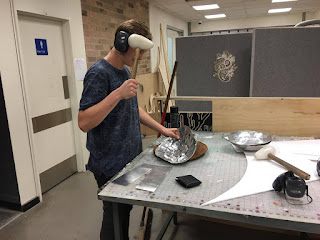
2 - After
watching the recommended videos consider how you want to make the torus/
reverse curve. If again the intention is to replicate the already created reverse
curve, then a log mold template was the approach. The log had been cut to allow
the metal to wrap around and then be struck and stretched.

Ensure the log is safely fastened in the vice or clamped/held to the table. Then wrap your metal over the piece and use a mallet to stretch the centre of your sheet. Note in the images above which end of the mallet to use and ensure to mallet only where the log has been cut out.

The result should resemble something like this. A nobly curve.
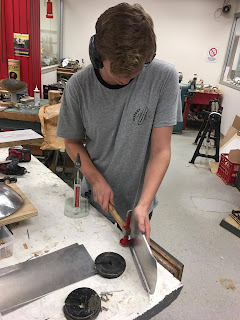
Step 4 – After the central curve is smooth, you can begin to shrink/stretch the edges in order to finish off the reverse curve. This was achieved by using a sand bag, pipe and mallet to shrink/stretch specific areas.
Firstly, mark a centre line on the still smooth edges.
Then begin to work the metal to form the reverse of the central curve you have already made. Do this until you are happy with the curves. It should have a symmetrical feel. You can then use the English wheel to finish off the curve as you did earlier.
Step 5 – Now that your curves are well formed you can finish the piece off by giving it a polish. Your piece will hopefully resemble something similar to this.


Reflection
In particular, the digital making aspect was of
interest as it had not been explored as thoroughly before. The application of the
digital making processes with metal shaping formed a relationship similar to a
landscape architecture process.
Reflecting upon this are images of Landscape Architecture projects found from the website Landezine. http://www.landezine.com

http://www.landezine.com/index.php/2016/07/opens-tomorrow-governors-island-phase-2-the-hills-by-west-8/


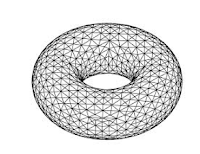
What
is a Torus (reverse curve)? - A torus is defined as a surface or solid formed by rotating a closed
curve, especially a circle, about a line which lies in the same plane but does
not intersect it (e.g. like a ring doughnut).
What does torus (reverse
curve) look like?


What Materials will you need?
- access to a workshop or
tools that are normally found within such as mallets, dollies, shot bags, metal
cutters, English wheel, gullotine etc.
- Aluminum sheet metal
- Pens/markers
- Log piece
- Enthusiasm!
Some
key points before you begin
1.
Ensure you have enough metal to
create the piece in which you desire, a torus will see a stretch of metal in
the centre and then a shrink where it is curved. Consider this when obtaining
your sheet.
2.
Always mark and plan where you want
to hit before striking, this will ensure you do not have to do things twice
(thinning and making it more difficult to manipulate the metal).
3.
Try to familiarise yourself with
your tools and what you want to achieve before attempting the end game.
4.
Never be afraid to ask for help or
advice. A second set of eyes can allow you to create the best possible outcome.
5.
Watch the suggested links below
https://www.youtube.com/watch?v=3Q5gjtTiGqQ
- a personal favorite!

Ensure the log is safely fastened in the vice or clamped/held to the table. Then wrap your metal over the piece and use a mallet to stretch the centre of your sheet. Note in the images above which end of the mallet to use and ensure to mallet only where the log has been cut out.

The result should resemble something like this. A nobly curve.
Step 4 – After the central curve is smooth, you can begin to shrink/stretch the edges in order to finish off the reverse curve. This was achieved by using a sand bag, pipe and mallet to shrink/stretch specific areas.
Firstly, mark a centre line on the still smooth edges.
Then begin to work the metal to form the reverse of the central curve you have already made. Do this until you are happy with the curves. It should have a symmetrical feel. You can then use the English wheel to finish off the curve as you did earlier.
Step 5 – Now that your curves are well formed you can finish the piece off by giving it a polish. Your piece will hopefully resemble something similar to this.


Reflection
As I am currently
in the final year of Landscape Architecture, the awareness of interdisciplinary
relations is important, as it will allow for the creation of the best possible
outcomes. This relationship coincided with the ability to create products out
of materials and the restrictions/capabilities that these materials hold. The processsees were also an
important learning curve as they drew parallels to how you would initially
design something in the field of landscape architecture and then in turn it be
created. This course emphasized the ‘created’ which is not something you always get a large role
in as a landscape architecture.
Reflecting upon this are images of Landscape Architecture projects found from the website Landezine. http://www.landezine.com
They situate the
torus or reverse curve in a disciplinary spectrum of related shapes.

This is Governors Island, Slide Hill in New
York.
The use of a torus is employed to create
four slides (including the longest slide
in New York City). The slides encompass a torus shape but also explores a raw
materiality and subtle expression of curves with relation to a change in
topography.

Vedahaugane is in Aurlandsfjellet, Norway.
This ‘double curve shaped’ path is
created from pre-cast concrete and is a landscape intervention that leads
walkers away from the road and towards a beautiful untouched valley dominated
by high mountains and eternal snow. The simple reversed curves respect the
natural form of the landscape.

The Garden of
10,000 Bridges is located in Xi’an,
China.
Its simple Torus formed bridges allow the public to gain a different
view of the surrounding landscape.
Comments
Post a Comment